Showing posts with label trend. Show all posts

29 Jun 2014

Moyou Nails Stamping Plate and Polish Review.

A couple day ago I was sent a lovely package from Moyou Nails. I had been waiting for a while and turned out my first one must have gone walkies. 
It contained 2 stamping plates, a gold stamping polish, a stamper and scraper. 

I haven't tried Moyou Nails before (not to be confused with Moyou London) but I liked the look of the designs I was sent.

Here's my first play....


The gold stamping polish is really good. It has like a glitter effect to it, its not just plain gold. It picked up really well and showed up great against the dark background. 
The base is Vant To Bite My Neck by OPI. 

The stamper and scraper work fine and pick up well but they are not what I would usually use as I prefer the Magno XL Stamper as it is squishy.

The only gripe I have about these plates is that the designs are not wide enough for me. I don't have wide nails particularly and usually the XL images are FAR too big so I am a tad confused as to why these design are so skinny.
That is why the middle finger design is different.... But that could have been intentional lol!

All in all I love the polish and it didn't smudge when top coated so I would recommend that but the stamps seem to small. They would be great for me personally for feature nails or something as they would never be wide enough for my thumb (and I suck at lining up two stamps lol) 


You can buy these stamps, polishes and other bits and bobs from HERE


Press sample. Some of these products have been sent to me for my honest opinions.

11 Jun 2014

JULY NAIL ART CHALLENGE

In July I will be running my very own nail art challenge!
Its a first for me but I really want another way to connect with other bloggers and nail artists.

I have chosen a range of prompts. Some easier than others so there is something for everyone!


You can post your pictures on Life in Lacquers Facebook page, your Instagram, Facebook or blog. Make sure to tag them #lifeinlacquerjuly and tag me @lifeinlacquer so I can see them! My tag is always @lifeinlacquer whether it be on Facebook or Instagram.

I will then share some of the pics on my Facebook page, of course with credit!

I'm posting this now so you have loads of time to prepare lol. You dont have to do everyone, I won't hunt you down!


Will you be taking part? Let me know below!
And PLEASE share this image around and get as many people involved as we can!

10 Jun 2014

Fantasy Unicorn Nail Art

This has got to be the cutest, most girly nail art I have ever done!


I used some nail vinyl stencils from She Sells Seashells for the unicorn. I know I have been doing loads of reviews for Nail Stickrs recently but of course they are not the only supplier and they do different stencils too. She Sells Sea Shells is also based in the UK.
They were easy to use and I got a great result too! I used Konad stamping polish in white to do them as it covers better than other whites.


You also get the cut outs left in the middle so they can be used as stickers :) 

I used Zoya Robyn, Unnamed Color Club Glitter, Essie Cascade Cool and Zoya Mira

I used Essie Cascade Cool as the base. Its such a powdery sweet pink. I really love it. Then used a sponge to splodge on the two +Zoya Nail Polish. Topped off with the Color Club glitter.
I hate that they don't label half the Color Clubs! I think its all the ones that come in sets that remain unnamed.

The metal charms are from eBay. I think I payed like £1 for a wheel with loads of different designs.

What do you think of my unicorn fantasy nails? I LOVE them!

I think I may be turning into an actual girly girl! HELP!

You can browse and buy various stencils and other nail art items from She Sells Seashells HERE


*some of these products were provided as a press sample for my honest review*

11 May 2014

Foil Squiggle Nail Art

I have wanted to try foils for so long so when Effect Beauty offered to send me some I jumped at the chance!
 I wanted to have a play and not, for now, go for the full nail foil coverage.

The foil comes rolled up in a plastic pot so its great for storage in ye olde Helmer. The actual sheet of foil is really long, I could do this nail art about 20 times I think! Obviously you would use more foil if you were doing a full nail.


This was really really hard to capture! 


I used a dotting tool to add the foil glue onto the nail in a random squiggly pattern. Then waited until the glue went from white to see through. I then placed and pressed the foil onto the nail and pulled it off. And this was what I was left with!!

In love with this, it catches the light and reminds me of a very exotic fish tail or something ha ha.

I used Mentality Polish Scoundrel. A black with a minute shimmer.

This foil and others are available from Effect Beauty and you can get 10% off with the code LACQUER :)


some of these products were sent to me for my honest review

20 Apr 2014

Easter Inspired Nail Art

Today I have actually managed to get a post done on time! 

This mani is inspired by Easter. I have a draw full of bits and bobs and today I chose to use the gold leaf. I highly doubt this is real gold leaf seeing as I payed about a quid for it but it looks good! 


The gold reminds me of Easter egg wrapping! I didn't want to go for the whole bunny and chick thing as that tends to be what the majority of other people are doing. 

I wanted to use a pastel shade as it really reminds me of spring. BUT I just couldn't find one that I felt went with the gold. 
I dislike gold.
Immensely. 

I used Barry M Gelly in Huckleberry and the Gold Foil Effect. I HATE the newer gellys. They are so thin! I like the thicker consistency of the others I have. They used to be great for stamping and art but that's not the case now. What happened +Barry M ?

The "gold" leaf was quite hard to get neat. I don't think its possible to get the application perfect. Its thin and a pain in the butt to use but it gives this mani an Easter twist.


What do you think? Have you ever used gold leaf?

And if you are celebrating Easter then have a great day, if not have a great day anyway!


15 Apr 2014

Mega Mix Nails Review Part 2

You may remember a couple of days ago I tried a new product called Mega Mix.

Mega Mix is a product that turns your nail polish or mica/glitter pigments into gel polish.

My first testing wasn't a complete success, you can read it HERE


So I thought it best to try out a more pigmented polish and see how that faired.
I figured that my most pigmented polish might be a Gelly by BarryM so I used Pomegranate.


As per my previous post I applied BarryM Pomegranate on the index finger and a mixture of Mega Mix and nail polish on the remaining three nails. 
2 coats on the index and 4 on the rest. 

This mixture fared considerably better than my previous one of Essie and MegaMix. 
Its not perfect though. You can still see my smile line and it has a jelly like appearance. 

But how can we expect it to be opaque when its effectively "watered" down by mixing in the clear gel? 
Would it not be better if the gel was tinted white?

Another point worth making is that this is time consuming and I ran out of mixture half way through so I do wonder if by mixing up a new batch half way through would the colour or coverage be the same?? 

What are your thoughts on this?
Do you prefer gel to polish?


Moyra Polish Review


Today I have a review of a brand called Moyra. They are new to the UK and stock a MASSIVE range of polish, nail tech items and nail art. 

I was sent three polishes to review and I have two to show you today, shade no 87 and no 304.


I decided to do this as a piece of nail art. When I saw the Metal Effect shade 304 I instantly thought STAMPING! 

So this is shade 87 on its own....


Oh how I love purple and this polish is no exception!
 The brush is a brilliant shape, not thin like Revlon but not as wide as Essie. You all know how I LOVE a good brush! 
I also like the longer handle on these bottles too. BUT I have to say I am not crazy about the way the bottles look.
The formula was great too, two coats in these pics. 
**The "rim" look on the ring finger is caused by my topcoat, not the polish**


Then I added some stamping using no 304.....


LOOK AT IT! Oh my! 

This stamps even better than my actual silver stamping polish! I am so happy with how this looks!
If you are looking for a silver stamping polish I would recommend this for sure.

Moyra polishes (so far) get a massive tick in my book! AND would you believe they are a budget polish? 
These are selling for £3 each at the mo.
They are available to buy from FACEBOOK and a website is on the horizon.

Have you tried Moyra yet?


These polishes were sent to me for my honest review.. Please see my disclosure for more details

13 Apr 2014

KBShimmer Full Bloom Ahead and Stamping Decal

Its a white crelly. 
I instantly love it. 
I then matte it.
It reminds me of a speckled egg. 
I love it even more.
THE END!! 


Hahah said polish is Full Bloom Ahead by KBShimmer. Its a white crelly featuring loads of glitter of different colours and sizes. 


I needed three coats to make this opaque but you can still kind of see my smile line. I don't mind this though as its not like super noticeable. The glitter distribution is good too, no fishing.

I then made a stamping decal using some acrylic paint in green and Cheeky Plate CH33. I do mine actually on the stamper instead of on a sheet of plastic. I also do not use topcoat to make them as I find its too much faffing and messing around and I always mess it up. After I have made the decal on the stamper I leave it to dry then stamp it on nearly dry polish on the nail and Tada. 

After all that I matted it all using my new topcoat by Mentality. This top coat is bloody great. It drys so much faster than my Orly matte topcoat and theres none of that bloody streaking. I recommend this to anyone. 

I think this looks really good and its been a while since I have made a decal too. 
What do you think? 


5 Oct 2013

Simple Stamping over OPI Pussy Galore!

I have never tried any OPI liquid Sands before but now i finally own one! 
Dont get me wrong I do own textured polishes just not any by OPI ;)
I have wanted this polish for a long time and it hasn't disappointed! 

This is two coats with no topcoat. 


Pussy Galore is a really pretty pastel pink with a pretty shimmer. My camera refused to pick up this shimmer really but its there in real life. 
This just reminds me so much of cupcake topping!
The stamping was done with MoYou Pro plate 4 and 10

What do you think of textured polishes? I actually really like them!


2 Oct 2013

Mountain Nail art

Hello my lovelies! 
The wether has been so bleugh here! 
yesterday we had our father in law round and he is an artist so as you can imagine we were sat talking and painting for a while lol! 

So this is what we came up with..... 

Marcus *father in law* gave me some tips and painted some things for me to copy. 
I actually found this okay to do, not too hard! 


Okay so we have mountains,birds, a kite and a hot air balloon. 

I used Essie's Butler Please and Avenue Maintain and a little BarryM at the bottom of the gradient. 

The rest is acrylic paints. 

So what do you think? I think the gradient could have been better but its all good practice! 


30 Sept 2013

Femme Fatale Swatches Part 1....

Hello all! 
I hope you are all having a great week so far! I feel like I have not posted in a really long time but it actually wasn't that long ago lol! 
My grandfather has built me even more shelves today so I am in need of more polishes to fill them up! If you all want to see my bits and bobs (behave) Ill be doing a small post on my updated stash soon!


I have two gorgeous polishes from Femme Fatale for you today! There are two more swatches on the way very soon.

Femme Fatale are an artisan cosmetic and nail polish company from Brisbane, Australia. 
They also now stock a wide range of other indie nail brands such as Enchanted and HARE. 


Both of these sets of pics are taken with the flash on as the light in my flat is bloody awful! Dont worry though they are colour correct etc! I wouldnt bring ya duff pics LOL! 

First up is a Sea Pony. A beautiful purple jelly cream (crelly). This polish features many different sizes of hex glitter. 


I used three coats to build this up and you could still kind of see the smile line, only very slightly though. It has a good amount of glitter and the formula is really nice. I have done this with no undies, but I think next time I use it I will try it on top of another colour, just to see what its like. 


Next up I have a beautiful linear holo called Burning Dusk. This is a darkish plum with a blue shimmer. who doesn't love a holo?! This is three thin coats with no topcoat. 


I am totally in love with this shade. it is dark but the blue shimmer really lifts the purple tone up. 
The coverage it really good and the formula is great. This is my fave of these two, I'm a fool for a holo. 

You can view these and other polishes, both by Femme Fatale and others, on their website HERE
Stay tuned for part two coming soon......

*some of these products were sent to me for an HONEST review. The views on this product are COMPLETELY my own.

28 Sept 2013

Incoco update 1 week on....

I have had Incoco on for a week now. 
The great news is they are still on! 


As you can see they have got tip wear and growth at the cuticle (obviously :P) 
I have not gone easy on these. I have had long baths, changed nappies and done the cleaning. All at the same time, LOL! 
I am very surprised that they are still on. Nail polish rarely lasts on me, unless its that pesky glitter!

Yes there is some wear etc but you would expect that from a regular polish. 
so all in all I love these. 
The application is fairly simple and I can see it getting better the more you do it. For me, they lasted fantastically. I'm really chuffed.

You can purchase these and LOADS of other designs HERE

What do you think? 
Would you wear these?

*some of these products were sent to me for an HONEST review. The views on this product are COMPLETELY my own.*

23 Sept 2013

Incoco Nail Polish Strips Review


This is the beautiful package that came last week!


These are nail polish applique strips. In simple turns they are strips of REAL nail polish. Instead of the standard nail wrap which are usually made out of plastic this is made out of polish. Base, colour and topcoat all in one!

They are from an American company called Incoco, they have just turned on international shipping so they are now available in the UK YAY!

They come in full nail,tip and pedicure strips.They come in a very wide range of designs. 
What I can straight up is that I love that they have a massive range. They have plain colours and designs. Whats more they are all 3 free.

For this review I tried the Neon Yellow ones. I really love this design and I wouldn't be able to do this by hand.

In the package you get 16 strips. Upon opening you can smell that they kind of smell like musty old nail polish LOL but this fades are they go on etc. 
You also get detailed instructions on how to apply.

Incoco make a big deal on the package and on the instructions about keeping them sealed until you use them as the air dries them out. So I used what I needed too and then resealed the pack with sellotape :)


To apply you simply remove the top plastic coat of the individual nail you have selected. the remove the bottom silver part as both ends are shaped slightly differently. Select which end fits your nail best. Peel off then apply. 

It was a bit fiddly to begin with and I did mess up on the index finger. 

But look at how good they look!! 


Yes I messed up but for a first go I am really happy and you cant really notice it in real life.
They are very thin and not like conventional wraps really as i cant feel them lifting up at the free edge. 
They claim to last up to 14 days..... 

I will keep you all updated on how they last. I really dont expect to get 14 days as real nail polish only lasts about 2 days on me. 


You can buy these HERE and check out their Facebook for the latest news.


*some of these products were sent to me for an HONEST review. The views on this product are COMPLETELY my own.*

26 Aug 2013

Hot Air Balloon Nail Art


I used the decal method for these hot air balloons. 

If you are not aware of the decal method there is a good video by Nailstampfanatic, explaining the process which you can find 

I used acrylic paint to do the clouds and added shadows in a slightly grey colour. Oooh get me being all artsy LOL!

Products Used 
China Glaze Electric Beat
Acrylic Paint
Konad Black 
Cheeky European Romance Jumbo Plate.
Seche Vite 

I really like this mani, simple but pretty. 
This type of decal method is also really easy to do once you get the hang of it.


11 Aug 2013

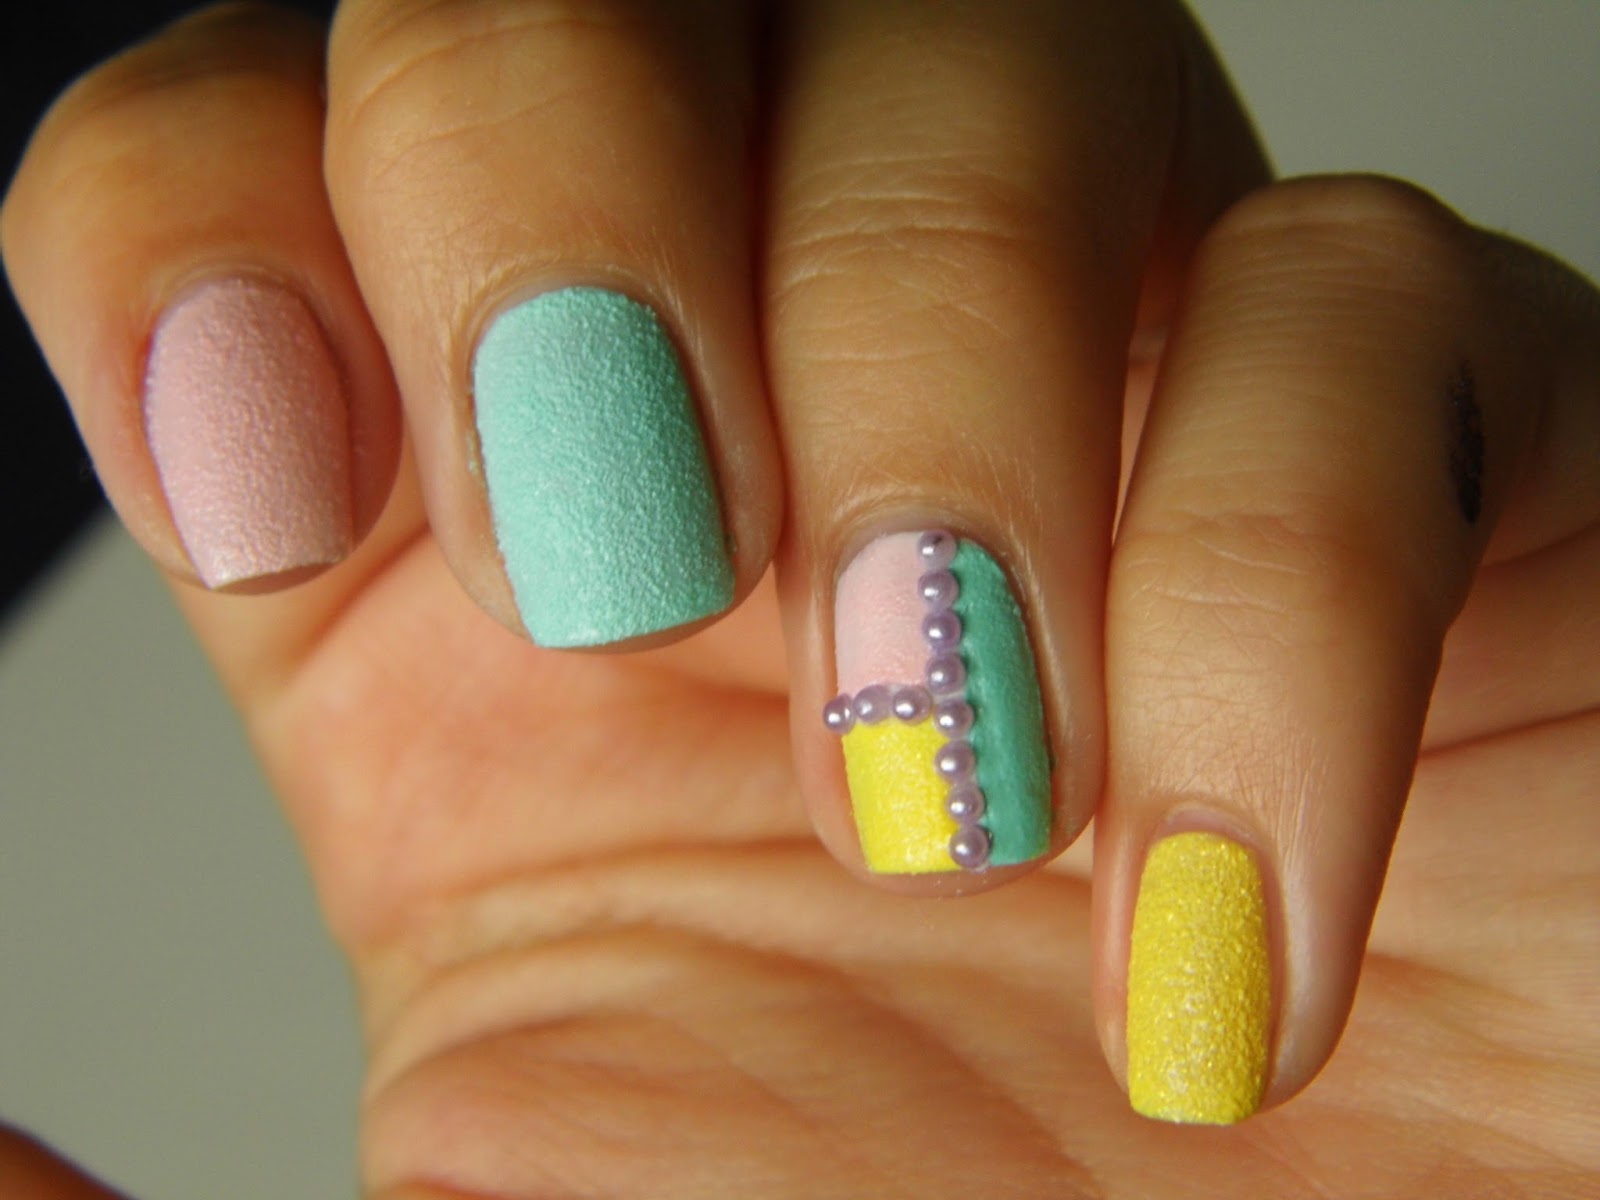
Pastel Textured Mani With Pearls


Today has been really nice weather so here's a lovely pastel mani to bring out your tan!
I was really not sure about textured polish but I actually really like this!
These are Station Road, Ridley Road and Kingsland Road by BarryM.
I have blogged about another textured polish by InVogue, which you can find HERE

This polish isnt textured enough that it annoys me, but textured enough to feel and see it. 
The yellow (Station Road) has glitter in it but I coulent really notice it that much, 

The pearls are from Sparkly Nails. They come in packs of 45 and sell for £1.50.
You can buy the pearls, along wuth a massive range of nail art products HERE

They are really easy to use. Just use a damp orange wood stick to pick them up and place onto damp topcoat. Sometimes I place them onto nail adhesive to make them really last. 

Sparkly Nails also offer same day dispatch and free delivery for orders over £20. 


What do you all think of textured nail polish? Love it or hate it?

*some of these products were sent to me for an HONEST review. The views on this product are COMPLETELY my own.*

5 Aug 2013

Artsy Rose Nail Art


Today 2 of my new stamping plates by Cheeky turned up.... 
So expect to see lots of stamping from now on! 

This is from the Home Sweet Home Jumbo plate 2013. 
I purchased them from +Amazon.co.uk. But because they came directly from Asia they took approx 12 working days to arrive. 
They have a nice range of patterns on. The full designs are a lot bigger than usual, but this isn't necessarily a good thing. looking at a few designs I am wondering if they will even fit on my nails. 

Only time will tell I suppose. 

But i really am looking forward to trying the new designs as there are some really funky ones! 

Products Used 
CND Sticky Base
BarryM Matte White 
Essie She's Pampered
Konad Special Polish in Black 
Seche Vite 

To do this I made circles in Shes Pampered first then indiviually stamped over them after. 
I think this does look a bit messy but i actually really like that, this pattern reminds me of Clarice Cliff in some ways. 
This also fits in to the new white nail trend! I have seen a lot of people wearin white nail polish recently, i remember the first time I wore white nail polish a few years ago.....
 My auntie said it looked like Tip-Ex LOL....