Showing posts with label stencils. Show all posts

1 Sept 2014

Fish Scales Nail Art and Tutorial

PRESS SAMPLE

This week I saw a lush nail art by Sammy from The Nailasarus and suddenly remembered that I had some fish scales stencils from Nail Stickrs that I still hadn't tried!


Fish Scale Nail Art

To see the tutorial video and what polishes I used, join me after the jump! 

27 Jun 2014

Cloud Nail Art

recently in my part of the UK it has been very very warm.
I dont like the heat. I'm a breeze and cloud kinda girl. Luckily today it clouded over and again lucky for me it inspired another cloud themed mani!


I am also really into negative space nail arts at the mo. I used a nail vinyl from Nail Stickrs to create the V shape at the base of my nail.
I was going to add some bling but then changed my mind as I didn't want to over do it.

I matted this too using Mentality's Matte topcoat. Not only do I love this topcoat but I find it so much easier to get better pictures as there is no reflection.

I used China Glaze Electric Beat and Essies Butler Please. I first used Electric beat as a base and then when that dried I used a sponge to randomly splodge on Butler Please.
Then I used my ole faithful St Petersburg Brush from Moyra and some acrylic paint for the clouds.

What do you think of this nail art? Would you have added some bling?


Press sample. Some of these items were provided for my review. All opinions are honest and my own.


6 Jun 2014

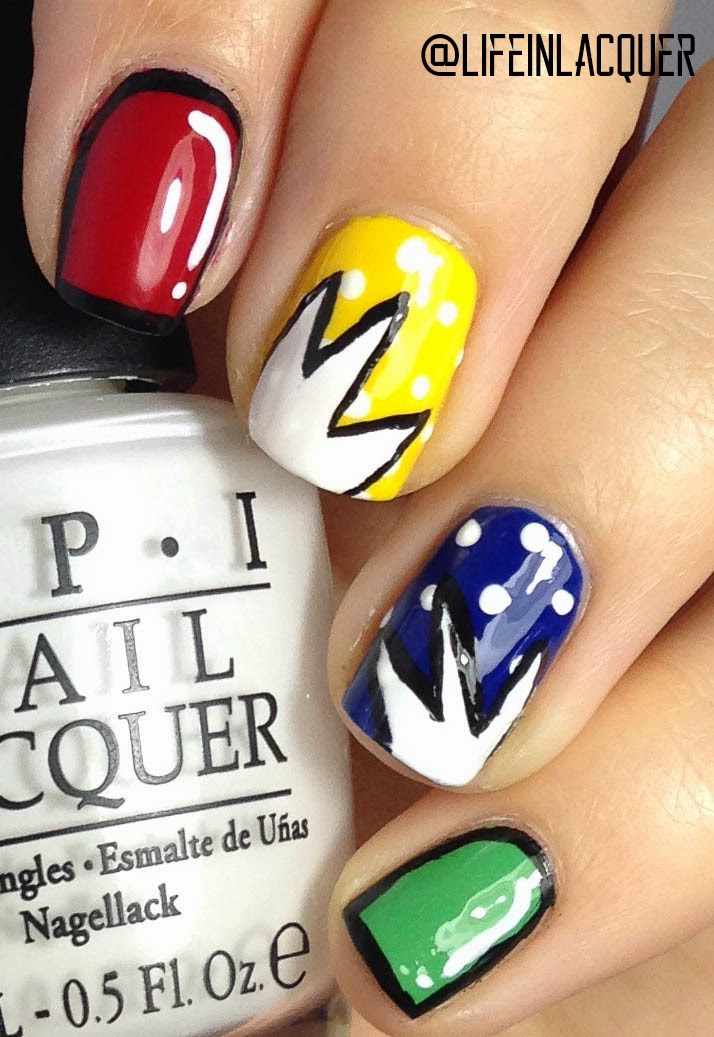
Cartoon Nail Art

I have always wanted to do a cartoon themed mani. In fact I did one a while back but it sucked sooo bad!


I started by picking out some bold primary colours. I thought It would be easy but it turns out I own like one of each!

I chose Chick Me Out by KBShimmer, Mojito Madness by Essie, Keeping Suzi At Bay by OPI and Red Passion by Maxfactor Glossfinity.

I started by doing two coats of each colour on each nail then waiting a little before adding the designs. I used acrylic paint and my fave brush, St Petersburg by Moyra UK, to do the designs. If you are in need of some really fantastic nail art brushes for acrylic nail art I really could not recommend Moyra enough. Aliz is fantastic and will help with any questions you may have :)

I then top coated and waited overnight before I used Nail Stickrs to make the "boom" shape. I was going to write Boom and Pow in them but I made them too small :(


The only reason I waited overnight was because it was SOOOO late by the time I finished this (about 2am) I didn't want to risk mucking it up.

I placed the Nail Stickrs where I needed them and made sure to press down along the nail walls. Then applied Alpine Snow by OPI over the top. I always remove the stencils when the polish is WET. I feel it works so much better and is less likely to ruin the design.

Using St Petersburg I outlined the explosions with black acrylic paint. Added topcoat by KBShimmer and....
TaDa all done!

Again the vinyl stencils worked wonders! I am loving them right now.

Nail Stickrs are available to purchase HERE (they do ship to UK) and you can see another mani I did using Nail Stickrs HERE


*some of these products were sent to me as a press sample. My opinions honest and of course my own*

5 Jun 2014

Nail Stickrs Review and Nail Art

Today I received these lovely samples in the post!


Nail Stickrs is a company based in the USA but they DO ship to the UK.  Shipping is cheap too, $2.50 which works out at around £1.49

I was sent a pretty big pack of stencils and stickers to play around with so expect quite a few designs with these babies!

Okay so today I decided to try the straight lines and the arrow type ones first. I am in love with all things geometric at the mo!


The polish needs to be proper dry before using these so I recommend waiting a while after base colour application. I didn't use a fast dry topcoat so waited about an hour. I have tried to use a topcoat to speed up this process before but I actually don't think it works too well. It makes you think its dry when its not, sneaky!

Nail Vinyl Stickrs how to apply

First I picked up a bunch of the stencils and the placed them on my nails. This way I can ensure they are straight and equally spaced. 


Nail Vinyl Stickrs how to apply

Then I removed every other sticker. I found using tweezers made this part easier. 
When I was happy with the positioning I used the end of the tweezers to push the stencils down into the sides of the nail to make sure there are no gaps. 


Nail Vinyl Stickrs nail art

Nail Vinyl Stickrs nail art using indie polish manglaze


And there you have it. The smallest tutorial of all time! The base is Manglaze Mayonnaise. A matte shimmery white. Takes 3 coats for opacity.

I then used a sponge and OPI Nein Nein Nein Okay Fine and Mentality's Scoundrel to create the gradient.

The triangle shape was also made using Nail Stickrs but this time I used the straight lines.

I did make some mistakes with these though. Some of the polish leaked under the stencil. I found using a little brush with some nail polish remover on cleaned it up a bit. I don't think they are bad at all for a first attempt!

Matted it all, again. I mean I just love matte!

What do you think of these new Nail Stickrs? I love them and whether your new or a dab hand a nail art these have a use for everyone.


You can purchase and peruse at their WEBSITE, FACEBOOK and INSTAGRAM


*products featured were sent to me as a press sample. Opinions are honest and all my own*

5 Jun 2013

French Tip Drip


 Nail Delights sent me these lovely smART stencils to try out. They reminded me of dripping water so I couldn't resist a blue gradient.

I found the stencils really easy to use as they don't pull up the underneath polish like normal tape or masking tape. they are made of a more plastic type material and they are really sticky but not in a way that damages the polish.
Colours are 
Fuchsia by China Glaze as the base. 2 coats
Blueberry Ice Cream and Gelly Blackberry both by Barry M
They come in a wide range of designs and cost £1.50 a pack and you can by them HERE

 
^ Here are the stencils ^