Showing posts with label kbshimmer. Show all posts

19 Oct 2014

Halloween Pumpkin Nail Art

Another Halloween type nail art today although this could also just be an Autumn themed one as its not particularly scary!

Halloween pumpkin nail art

I used KBShimmer Dancing Green and Moyra 621 to do this mani. 

I think I also need to be honest with you all. I don't even know who bothers to read this or anything and sorry for the rant in advance.... 

I am really getting upset about my hand shakes and I hate the way my art turns out pretty much every time. I try so hard and I have an image in my head an then I cant even hold a paintbrush without my hand going stupidly shaky. I look at everyone else beautiful manis and even consider jacking everything in. I hate the way my photos look and GRRRR. A bad time indeed. *sobs*


I hope you like what I am trying to achieve. Thanks for reading.

24 Aug 2014

Marcus Manis: Bridget Riley Inspired

Hello my lovelies!

Its that time of the week where we see what nail arr Marcus has been doing. If your new to the blog then ill just take a minute to fill you in. Marcus is my father in law. He is an artist and hew also enjoys painting and having his nails painted. When he comes to visit we sit ans brain storm about designs, Marcus usually goes for something inspired by another artist.


Anyway here is what he came up with this time.


 More pictures and details after the JUMP!

13 Aug 2014

Pastel Lines Nail Art

I haven't had a chance to do any nail art in a little while so here is one I did just after the Life in Lacquer July Challenge.My laptop broke and I have only just got a replacement and now comes the painstaking task of installing all my files again etc....


As you can see my nails are still square shaped in this nail art, what nail shape do you prefer?

This type of lined nail art is very simple to do and all you need is a small brush and some acrylic paint or some nail polish. I chose to do a triangular shape and then I just got a bit carried away!


I used KBShimmer Iris My Case and Moyra Limoncello. I painted the pattern using some Oumaxi acrylic paint. This paint is quite thin but it is easy to use.

I am not totally happy with this, the pattern looks streaky and off centre. But I quite like the colour combination. I love KBShimmer, I have never met a shade that I don't like.

Hopefully I will be back into posting regularly soon and Ill get a hang of this new laptop and sucky Windows 8!


7 Jul 2014

Life in Lacquer Nail Art Challenge: PINK


Today is the second installment of my nail art challenge!! I hope your enjoying looking at everyones nail art so far.

Todays prompt is pink. This is a very broad prompt and could even just be a swatch of a pink polish. I wanted to do prompts that everyone could take part in, from beginners to pros.

Heres my contribution...


Why, oh why, does my camera HATE bright pinks? These colours are so funky and summer orientated. 
This is Moyra 919 and KBShimmer Belle of the Mall. I bought this thinking it was red but mine is for sure pink. Yes it is a red leaning pink but its pink none the less. it was incredibly hard to capture.

I handpainted the roses and buds using acrylic paint and my new fave brush St Petersburg from Moyra, I am incredibly happy with how they turned out. 

What do you think?

Pop on over to our Facebook page and Instagram (@lifeinlacquer) and see what everyone else has come up with :)


6 Jun 2014

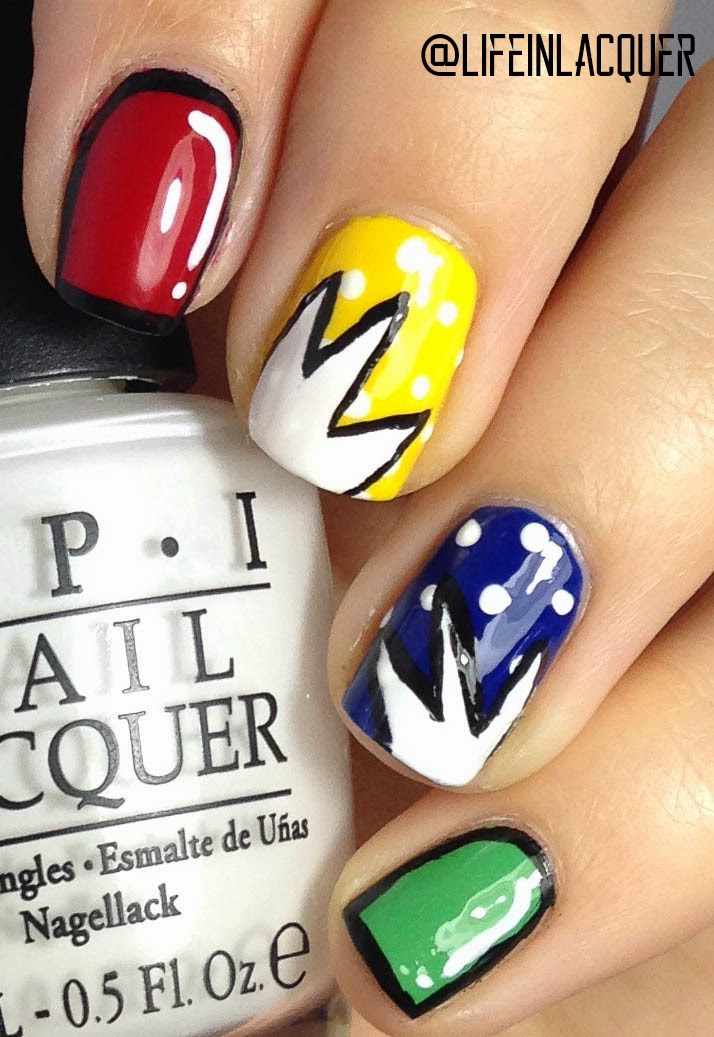
Cartoon Nail Art

I have always wanted to do a cartoon themed mani. In fact I did one a while back but it sucked sooo bad!


I started by picking out some bold primary colours. I thought It would be easy but it turns out I own like one of each!

I chose Chick Me Out by KBShimmer, Mojito Madness by Essie, Keeping Suzi At Bay by OPI and Red Passion by Maxfactor Glossfinity.

I started by doing two coats of each colour on each nail then waiting a little before adding the designs. I used acrylic paint and my fave brush, St Petersburg by Moyra UK, to do the designs. If you are in need of some really fantastic nail art brushes for acrylic nail art I really could not recommend Moyra enough. Aliz is fantastic and will help with any questions you may have :)

I then top coated and waited overnight before I used Nail Stickrs to make the "boom" shape. I was going to write Boom and Pow in them but I made them too small :(


The only reason I waited overnight was because it was SOOOO late by the time I finished this (about 2am) I didn't want to risk mucking it up.

I placed the Nail Stickrs where I needed them and made sure to press down along the nail walls. Then applied Alpine Snow by OPI over the top. I always remove the stencils when the polish is WET. I feel it works so much better and is less likely to ruin the design.

Using St Petersburg I outlined the explosions with black acrylic paint. Added topcoat by KBShimmer and....
TaDa all done!

Again the vinyl stencils worked wonders! I am loving them right now.

Nail Stickrs are available to purchase HERE (they do ship to UK) and you can see another mani I did using Nail Stickrs HERE


*some of these products were sent to me as a press sample. My opinions honest and of course my own*

18 May 2014

We're All Going On A Summer Holiday...

That time of year is finally upon us.... HOLIDAY!

We are off just a couple hours down the road to Newquay in sunny Cornwall for a 7 night break away. This year we are also taking my dad and my brother with us.... This could be interesting LOL!

We always holiday within the UK and we go to Newquay every year. Its like a home away from home for us. Seeing as I will be gone for a week in a caravan,I will not be able to blog post. Oh My Gawd! How are you all going to cope with that :P

I'm going to be using that time to catch up on crochet orders and hopefully make some stuff for my upcoming shops opening!

I am feeling in a particularly happy holiday mood so here are some lovely holiday nails.


I used China Glaze Four Leaf Clover and KBShimmers Dancing Green. I did the simple glitter gradient then stamped over the top with Konad white, which then turned greeny yellow lol. To stop this happening to stamped whites remember to topcoat before stamping. I did not remember...

I haven't used a green in, like, well forever.... I really love this though!

I hope you all don't miss me too much ?! And ill see you in around a week ish!


6 May 2014

Color Club Worth The Risque Nail Art

I have been doing a lot of girly nail arts recently... 
So now I have gone for something abit more flashy!
This reminds me of something very futuristic, a bit like the mani I did for KBShimmers Blog a while back. 
I bought this Color Club polish, along with a few others, a really long time ago and I am only now just getting round to trying it! 


This is two coats but to be honest if you were in a rush then one thick coat would work just fine! 

Worth The Risque is quite a strong holo in real life.
I really really like it! 

Color Club also do a range of stripers and I used the black to do the pattern. The stripers are actually really good and cover really well! 
I added the studs into the topcoat. I purchased them from the Born Pretty Store. 


What do you think of this? 
Thanks for reading, my lovelies! 


2 May 2014

Artistic Brush Strokes Nail Art

Effect Beauty has sent me a ton a goodies to play with and share with you all and today we have a very simple nail art using one of their nail art brushes and their silver Mylar flakes
Today I wanted to show you all a nail art that can be done using a flat brush. I usually save these for clean up brushes but I wanted to try out something different this time. 


I used 3 different coloured acrylic paints. 
The paints I used are just a cheap set from The Works. If you don't use acrylic paints then please look into them and give them a try. I used to struggle with nail art until I started using paints. They cover better and I personally think more is achievable with them. 

ON TO THE NAILS......


The brushes seemed alot nicer quality than the cheap ones on eBay. They are softer and I can wait to try more of them out! 
They come in a set of 5. 
The Mylar Flakes come in a bag of 5g but going by the tiny amount I use for this, that's going to last a LOOONNNGG time! 


I used the brush to "scrub" the colour onto the nail. 
Do not overload the acrylic paint on the brush. It needs to have like minimal paint on the bristles. 
I then placed Mylar onto one corner using topcoat to stick it. It reminds me of a mermaid! 

I used an unnamed light greeny blue Color Club polish for the base. The glitter polish is Laugh Myself Lily by KBShimmer, matted. 

I really like this nail art. It really does remind me of the sea or mermaids, Its so easily achieved too.

Effect Beauty have been very kind and they are offering all Life In Lacquer readers 10% off on their website. Just use code LACQUER at checkout. 
This code should be valid from 02/05/2014
CLICK HERE to be taken to Effect Beauty :) 

**these items were sent to me for my honest review. This are my own opinions**

26 Apr 2014

Funky Line Nail Art + Sam Biddle Pen Review

I've finally had time to sit and have a little play with the nail art pen by Sam Biddles Be Inspired Range. 

I bought this and the Nails Supreme pens a while back to add to my nail art tool kit. 

This pen looks just like an old school dip pen but it has been modified to cater for thicker paints i.e water based acrylic. The paint has to be the consistency of cream. The paints designed to be used with this pen are also sold on Sam Biddles website. I bought black and white as I figured they would be the ones I would use most. 

When I received the pen it was already assembled and when I took it out the package I realised straight away that it felt really light in the hand. I personally am not a fan of that. I would prefer a bit more weight. I like to feel like I have a hold of something. 


I did my design using polish. Then used a fast dry topcoat. I then outlined in white using the pen and paint. As you can see I kinda messed this up and I got into a right kerfuffle. I tried to go over the lines to make them thicker and more bold but it was just dragging the already there paint off! 


Here's where I went wrong.
I used topcoat.
I couldn't put any real pressure on the pen as it was denting the topcoat. I just have no patience when it comes to drying time lol. The problem is the shine. I have problems with normal nail art acrylic gripping to that so I have no idea what possessed me to topcoat??!!! 

One other thing of note is how much mess i made! I got paint all up my arm and all over my hands. I am a really messy person anyway so I wasn't really surprised. 

All in all I need a shed load more practise and I believe the pen not doing a great was my fault

I have used this pen previously for my Earth Day nails. I found the text easy to do and Ill tell you for why.... I let the polish dry without using a fast dry topcoat. It was easy to get the paint to "grip" but still I found the flow could be uneven but I think with some practise this pen could be a nifty piece of kit to have, even if its just for writing text. I just cannot do text with a brush.


For the rest of this nail art I used Zoya's Areej and Mira. KBShimmer Chick Me Out and Sick Lacquers Grape Juice.


Have you ever tried this pen? Did you like it? 

You can buy this pen and the paints from HERE

22 Apr 2014

Earth Day Inspired Nail Art

Happy Earth Day!

I have gone with a very simple nail art today. As you can see I am back to nubbins :( 
I had a really bad break on my index finger about a week ago and I managed to patch it but it finally gave way. I think I am going to stay with shorter square nails. 
What do you think? Do you prefer my old long and rounded or short and square?


Anyway getting back to the nail art! 


I used Zoya Robyn (a personal fave of mine) KBShimmer Laugh Myself Lily (Harlow haul post) OPI Alpine Snow and acrylic paints. 

I used my new Nail Art Pen from Sam Biddle. I will be doing a more in depth post about this very soon. 

I love painting these little clouds. It about as artistic as I can manage! I messed up the actual Earth and its not geographically correct :P 

I hope you have enjoyed my Earth themed nails! 


19 Apr 2014

Mehndi Summer Doodles with Marcus

Today we have a collab between me and my father in law Marcus.

We were running late with our usual biweekly takeaway and we couldn't decide what to do. The idea is great but we could do with messing around with it abit to fine tune this.

I did the base and Marcus did the doodling. I love Mehndi designs and when I told Marcus this he was keen to give it a go!


I chose to do the base bright and funky as I havent really seen this type of design done before.
I painted my nails white and then used a sponge to add the colour. I used Vant To Bite My Neck by OPI, Chick Me Out by KBShimmer and Robyn by Zoya. I layered these and then sponged on some subtle glitter.

When this was all dry Marcus used the White Nails Supreme pen to create the design. He took to these pens like a duck to water. I was a bit jealous lol! 

Like i said we didn't have as much time as we usually do so we are going to come back to this theme at a later date. I am still very very happy with it!

I also love that this is a collab! I liked actually being part of the design,

What do you think of our creation? Do you like it when Marcus features on the blog?

13 Apr 2014

KBShimmer Full Bloom Ahead and Stamping Decal

Its a white crelly. 
I instantly love it. 
I then matte it.
It reminds me of a speckled egg. 
I love it even more.
THE END!! 


Hahah said polish is Full Bloom Ahead by KBShimmer. Its a white crelly featuring loads of glitter of different colours and sizes. 


I needed three coats to make this opaque but you can still kind of see my smile line. I don't mind this though as its not like super noticeable. The glitter distribution is good too, no fishing.

I then made a stamping decal using some acrylic paint in green and Cheeky Plate CH33. I do mine actually on the stamper instead of on a sheet of plastic. I also do not use topcoat to make them as I find its too much faffing and messing around and I always mess it up. After I have made the decal on the stamper I leave it to dry then stamp it on nearly dry polish on the nail and Tada. 

After all that I matted it all using my new topcoat by Mentality. This top coat is bloody great. It drys so much faster than my Orly matte topcoat and theres none of that bloody streaking. I recommend this to anyone. 

I think this looks really good and its been a while since I have made a decal too. 
What do you think? 


12 Apr 2014

You Drive Me Katie and Leopard Print Nail Art

I received a BIG nail mail parcel today from the lovely Katie from Harlow & Co. You can see what I bought HERE 

My bank balance has fallen out of love with me since I found Harlow but man do they make me happy!! I now buy all my indies there (pretty much) and its free international shipping over 100 Canadian Dollars. They also usually get to me within 5 days!! 

Today I chose You Drive Me Katie by KBShimmer. Its a Harlow exclusive and its pink!! 
Anybody who knows me knows I am not a pink girl but recently I have really loved wearing pinks, on my nails mind you! 


This a beautiful crelly (cream jelly) and it a true bubblegum shade. It is jam packed with white, purple and blue glitters of all shapes and sizes!! 
This applies fantastically (just like every other KBShimmer I own) and I used 2 coats for the pics. As this is a polish is dense in glitter I used two coats of KBShimmer Clearly On Top to finish it off.

I of course had to add some nail art. On my little and index finger I used Essie Neo Whimsical and Lights to make a gradient and then hand painted a leopard print over the top! How bright and funky! 

This is screaming summer to me and I think this would look so fab on my tootsies!!

I did this nail art especially for a pink mad nail addict called Claire. She loves pink and I think she has now turned me onto pink too! 

What do you think? Are you a fan of bold nails !?

11 Apr 2014

My Harlow Haul 11/04/2014

Oh no..... 

I went on to Harlow & Co and something very strange happened...... 

12 new nail polishes just jumped into my cart and then in my confusion I must have payed for them! 
That's my story and I am sticking to it!!


 Belle Of The Mall, Lottie Dottie,Falling For Hue, You Drive Me Katie 


Make My Gray, Spring Training, Laugh Myself Lily, Chick Me Out, Full Bloom Ahead


I had to get the new KBShimmer Spring Collection on the restock as I missed them all the first time around. I also picked out a few others. Spring Training is even scented!


She Had A Lipstick Taser 

I had to have the Glam Polish as I haven't tried them before and they are discounted as the new bottle shape has been released (I have the old shape) 


Serendipity

I had to have the Cadillacquer because I bloody love Cadillacquers. I wanted another shade too called Easy As Pie but it was sold out :( 


Snow In Love 

I had to get the Serum no 5 as its a crelly and glows in the dark. I already have Atomic Peach and that glows so strongly I knew I had to give this one a try! 


I love it when I get nail mail. My eldest, who is three, was screaming NAIL MAIL and getting so excited! 

What do you think of my haul? Do you already own any of these? 

Which one should I use first? 


28 Feb 2014

Guest Post for KBShimmer

hello! 

Today you can find me at KBShimmer's blog! 

I have done a  very funky and futuristic nail art using a LUSH multichrome called Pigment Of My Imagination. 


Please pop on over and check it out HERE and leave some love and comments!