Showing posts with label nail stickers. Show all posts

1 Sept 2014

Fish Scales Nail Art and Tutorial

PRESS SAMPLE

This week I saw a lush nail art by Sammy from The Nailasarus and suddenly remembered that I had some fish scales stencils from Nail Stickrs that I still hadn't tried!


Fish Scale Nail Art

To see the tutorial video and what polishes I used, join me after the jump! 

19 Jun 2014

Wedding Nail Art

Todays is our fourth wedding anniversary :)

We got married in a small registry office whilst I was 36 weeks pregnant. Not a shotgun wedding I swear :P

I did a nail design based on the colour theme and the outfits we wore.


I thought I wore a straight neckline but turns out I wore a sweetheart one haha! 
The butterfly sticker from Nail Stickrs represents a butterfly broach I wore gifted to me by my nan. 
The butterfly is beautiful and glittery! Also its not really thick so sits on the nail nicely.

I used Moyra 87 and Manglaze Mayonnaise for the purple and white and acrylic paint for the rest. 

Unfortunately the picture isn't the best. 
Sometimes its a battle and sometimes I don't win. 


Heres to more years together! 


 some products were sent to me for my honest review. Opinions are my own.

19 Feb 2014

Blue Flower Nail Art

Today I have some pretty stickers from Sparkly Nails to show you.

I really wanted to use my new Girly Bits polish called Cosmic Ocean so I used it over this LAME gradient. It is so much more noticeable in real life but pastels are my enemy! I can never get them to show their true colours!


Cosmic Ocean is so sexy. It makes a huge difference to the polish and mani overall. It gives it a blue iridescent glittery shimmer that really makes it pop!

I used BarryM Gelly in Guava with Blueberry sponged onto the ends. If you squint you may be able to see it!!

The stickers are very easy to apply, they are the spongy type of stickers. After I have applied the stickers I just top them off with a top coat. 
I think they go really well with the blues.

You can buy these stickers and other nail art bits HERE and you can check out Girly Bits HERE

Hope you are all having a good week so far!


*these stickers were sent to me for review. All opinions are my own HONEST thoughts and ramblings*

8 Dec 2013

First Christmas Nails!! Snowflake Stickers

This is my first Christmas post EVER!! 

I have been sent these lovely snowflake stickers from Sparkly Nails to try out!

They are a bumpy 3D texture, spongy almost LOL! 

They come in various sizes and look fab with Color Clubs Otherworldly! 


Otherwordly is a bright blue jelly with holo glitter. Unfortunately you cant really tell its holo glitter on the nail but you can in the bottle. It basically just looks like silver glitter. 
Still pretty though! 

 The stickers can be purchased HERE 


**one or more of the items featured here have been sent to me for my HONEST review. Please see my disclaimer for more details**

28 Sept 2013

Incoco update 1 week on....

I have had Incoco on for a week now. 
The great news is they are still on! 


As you can see they have got tip wear and growth at the cuticle (obviously :P) 
I have not gone easy on these. I have had long baths, changed nappies and done the cleaning. All at the same time, LOL! 
I am very surprised that they are still on. Nail polish rarely lasts on me, unless its that pesky glitter!

Yes there is some wear etc but you would expect that from a regular polish. 
so all in all I love these. 
The application is fairly simple and I can see it getting better the more you do it. For me, they lasted fantastically. I'm really chuffed.

You can purchase these and LOADS of other designs HERE

What do you think? 
Would you wear these?

*some of these products were sent to me for an HONEST review. The views on this product are COMPLETELY my own.*

22 Apr 2013

How to Make Your Own Nail Decals, Simples!


Well then Lacquer Lovers have you ever had problems with placement of individual konad stamps? Or have you ever wanted to premake some hand painted decals for another time or for a friend?
 
Here's a new way of getting them perfect!
 
I'm feeling like a nail genius today!
 
Okay so here it goes....
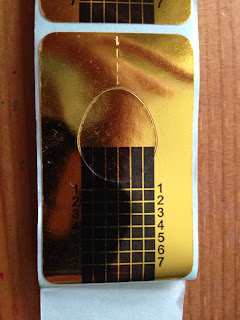
First you need to fine something that the nail polish will remove easily from. I chose a Nail Form. nail forms are used in acrylic nail sculpting.
^This is a nail form^
 
 
Then i used my Lumos Top Coat and placed a thick coat over the top of the form
Leave this to dry. I left to dry over night as I had forgotten about it... Oopsies :)
 
Then loosen it from the nail form.
 
^This is the nail polish "film" That you have made to stamp on to^
 
 
Stamp into the Nail Polish "film"
Cut to size
Then place onto your nails and topcoat over
 
TADA!
  EDIT: You could also use it to embed things like a pretty napkin or thin fabric by following all previous steps but just dont wait for the polish to dry on the form, add when its wet. Then add one more coat of clear polish ontop when dry.
Okay so its not perfect as you can see a slight line if you look really closely at the nail but I'm sure there are ways around this. This is my first attempt. You could try actually cutting around the image so there is no border?
You could also hand paint tour design instead of stamping using either acrylic paints or nail polish.
 
Give this a try and email me some pics and ill upload them for other to see on here :)