Showing posts with label usa. Show all posts

21 Jul 2014

Life in Lacquer Nail Art Challenge: BLUE featuring Video Tutorial

Another #lifeinlacquerjuly mani. How are you all liking the challenge so far? I hope your enjoying seeing others work on my Instagram!

Ive been totally overwhelmed by all the people taking part! I thought no one would so I am sooo happy you are all joining me on this!


Today is another very broad prompt...Blue. 
I chose to get my Nail Stickrs out for this one. Maybe it would have been more suited to the Geometric prompt but oh well :)

Nail Stickrs geometric blue nail art

Nail Stickrs geometric blue nail art


AND theres a couple videos to accompy this too! Im getting there with the whole video thing. I still find them quite hard and awkward to film but I am getting there. 
Again these are fast so I can put them on Instagram. Do you think I should make longer versions for Youtube? 

Here is how I did the gradient.....
 

And here is how I used the Nail Stickrs to create a sponge chevron.


I hope the videos go a little way in showing you how I did this look.
I am really interested to know what you think about them so please do let me know.

For this look I used Essie Butler Please, Avenue Maintain and Sweet Talker. I also used Moyra 304 on the chevron nail. 
All of this was one ontop of a white base
And then of course it needed some bling! These beautiful metal star charms are from Effect Beauty. I love them! They are slightly curved so fit to the nail really well unlike other flat charms, plus you get a decent amount for your money.


Soooo what do you think? Please check out the other blog entries from Life in Lacquer July below!

**some of the products featured were sent to me as press samples. All opinions are my own**

28 Jun 2014

LIFE IN LACQUER NAIL ART CHALLENGE

The day will soon be upon us... The start of Life in Lacquers first nail art challenge.


This is open to absolutely everyone. You do not need to be a blogger or anything. Even if you don't feel like you are any good I would still love to have you be part of this!

The reason I am running this is so we can all meet new friends and get some inspiration!


The prompts run on a Monday and a Thursday. You can post your image to our FACEBOOK page or use #lifeinlacquerjuly AND tag me @lifeinlacquer on Instagram, twitter and other medias. I will then share some on my Facebook and Instagram (with full credit of course)

You do NOT have to do every prompt if you don't feel like it.

There is also now a inlinz. So if you write a blog post you can add the inlinkz via HTML so you can all see other entries. You may add as many links as you want as long as it relates the the challenge and the links are your own. You can find the inlinkz code HERE


if you have any questions AT ALL then please drop me an email through the Contact Me/PR page above!

Cant wait to see all your efforts!

27 Jun 2014

Cloud Nail Art

recently in my part of the UK it has been very very warm.
I dont like the heat. I'm a breeze and cloud kinda girl. Luckily today it clouded over and again lucky for me it inspired another cloud themed mani!


I am also really into negative space nail arts at the mo. I used a nail vinyl from Nail Stickrs to create the V shape at the base of my nail.
I was going to add some bling but then changed my mind as I didn't want to over do it.

I matted this too using Mentality's Matte topcoat. Not only do I love this topcoat but I find it so much easier to get better pictures as there is no reflection.

I used China Glaze Electric Beat and Essies Butler Please. I first used Electric beat as a base and then when that dried I used a sponge to randomly splodge on Butler Please.
Then I used my ole faithful St Petersburg Brush from Moyra and some acrylic paint for the clouds.

What do you think of this nail art? Would you have added some bling?


Press sample. Some of these items were provided for my review. All opinions are honest and my own.


25 Jun 2014

Lightening Nail Art using Nail Stickrs

A quick, simple and easy nail art today!

This look is so easy to do all you need is two polishes and some nail vinyl stencils. These ones are from Nail Stickrs.
Nail Stickrs are an American based brand but they ship to the UK for about £1.50 ish so very reasonable! I also happen to know that they have some very exciting new styles coming soon!


I used Moyra 602 and Jasmines Wish (853). Jasmines Wish is a stunning textured polish. A teal with a golden glitter effect.


I have really tried to get this colour as accurate as possible, it was a pain to photograph! 
Doesn't it look like a Drusy?!

Its formula is great. Cover fantastically in 2 coats and of course you don't need top coat! 


I love pairing textured polishes with ordinary ones!
What do you think of this? 

Nail Stickrs are available from Here. Moyra has a brand new website Yay!! You can find it Here.


Press sample. Some of these products were sent for my honest review. 

6 Jun 2014

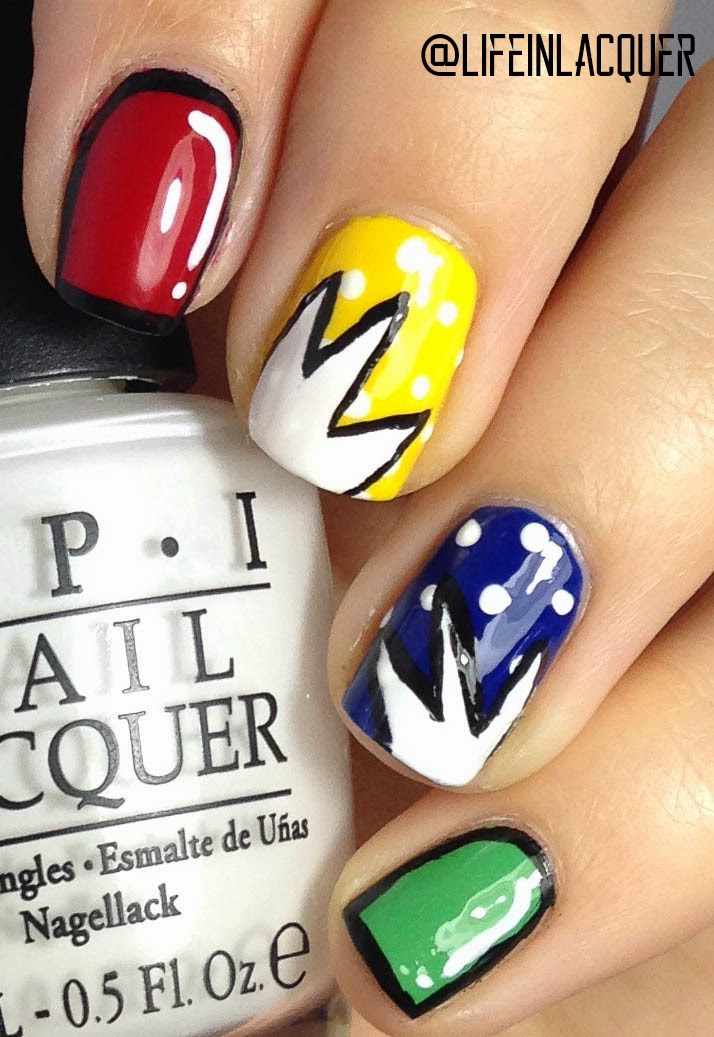
Cartoon Nail Art

I have always wanted to do a cartoon themed mani. In fact I did one a while back but it sucked sooo bad!


I started by picking out some bold primary colours. I thought It would be easy but it turns out I own like one of each!

I chose Chick Me Out by KBShimmer, Mojito Madness by Essie, Keeping Suzi At Bay by OPI and Red Passion by Maxfactor Glossfinity.

I started by doing two coats of each colour on each nail then waiting a little before adding the designs. I used acrylic paint and my fave brush, St Petersburg by Moyra UK, to do the designs. If you are in need of some really fantastic nail art brushes for acrylic nail art I really could not recommend Moyra enough. Aliz is fantastic and will help with any questions you may have :)

I then top coated and waited overnight before I used Nail Stickrs to make the "boom" shape. I was going to write Boom and Pow in them but I made them too small :(


The only reason I waited overnight was because it was SOOOO late by the time I finished this (about 2am) I didn't want to risk mucking it up.

I placed the Nail Stickrs where I needed them and made sure to press down along the nail walls. Then applied Alpine Snow by OPI over the top. I always remove the stencils when the polish is WET. I feel it works so much better and is less likely to ruin the design.

Using St Petersburg I outlined the explosions with black acrylic paint. Added topcoat by KBShimmer and....
TaDa all done!

Again the vinyl stencils worked wonders! I am loving them right now.

Nail Stickrs are available to purchase HERE (they do ship to UK) and you can see another mani I did using Nail Stickrs HERE


*some of these products were sent to me as a press sample. My opinions honest and of course my own*

5 Jun 2014

Nail Stickrs Review and Nail Art

Today I received these lovely samples in the post!


Nail Stickrs is a company based in the USA but they DO ship to the UK.  Shipping is cheap too, $2.50 which works out at around £1.49

I was sent a pretty big pack of stencils and stickers to play around with so expect quite a few designs with these babies!

Okay so today I decided to try the straight lines and the arrow type ones first. I am in love with all things geometric at the mo!


The polish needs to be proper dry before using these so I recommend waiting a while after base colour application. I didn't use a fast dry topcoat so waited about an hour. I have tried to use a topcoat to speed up this process before but I actually don't think it works too well. It makes you think its dry when its not, sneaky!

Nail Vinyl Stickrs how to apply

First I picked up a bunch of the stencils and the placed them on my nails. This way I can ensure they are straight and equally spaced. 


Nail Vinyl Stickrs how to apply

Then I removed every other sticker. I found using tweezers made this part easier. 
When I was happy with the positioning I used the end of the tweezers to push the stencils down into the sides of the nail to make sure there are no gaps. 


Nail Vinyl Stickrs nail art

Nail Vinyl Stickrs nail art using indie polish manglaze


And there you have it. The smallest tutorial of all time! The base is Manglaze Mayonnaise. A matte shimmery white. Takes 3 coats for opacity.

I then used a sponge and OPI Nein Nein Nein Okay Fine and Mentality's Scoundrel to create the gradient.

The triangle shape was also made using Nail Stickrs but this time I used the straight lines.

I did make some mistakes with these though. Some of the polish leaked under the stencil. I found using a little brush with some nail polish remover on cleaned it up a bit. I don't think they are bad at all for a first attempt!

Matted it all, again. I mean I just love matte!

What do you think of these new Nail Stickrs? I love them and whether your new or a dab hand a nail art these have a use for everyone.


You can purchase and peruse at their WEBSITE, FACEBOOK and INSTAGRAM


*products featured were sent to me as a press sample. Opinions are honest and all my own*

18 May 2014

We're All Going On A Summer Holiday...

That time of year is finally upon us.... HOLIDAY!

We are off just a couple hours down the road to Newquay in sunny Cornwall for a 7 night break away. This year we are also taking my dad and my brother with us.... This could be interesting LOL!

We always holiday within the UK and we go to Newquay every year. Its like a home away from home for us. Seeing as I will be gone for a week in a caravan,I will not be able to blog post. Oh My Gawd! How are you all going to cope with that :P

I'm going to be using that time to catch up on crochet orders and hopefully make some stuff for my upcoming shops opening!

I am feeling in a particularly happy holiday mood so here are some lovely holiday nails.


I used China Glaze Four Leaf Clover and KBShimmers Dancing Green. I did the simple glitter gradient then stamped over the top with Konad white, which then turned greeny yellow lol. To stop this happening to stamped whites remember to topcoat before stamping. I did not remember...

I haven't used a green in, like, well forever.... I really love this though!

I hope you all don't miss me too much ?! And ill see you in around a week ish!


8 May 2014

Keep Breathing Little Fishy

I have wanted to use Keep Breathing by Cadillacquer for so long but for some reason I have overlooked it whenever I pick out my polishes. 

I didn't have a nail art in mind when I started putting this on but then my eyes fell on my poorly goldfish. His tank is directly opposite where I sit to do my nails. He has swim bladder disease and so far is not getting any better. We bought the goldfish as gifts for my son the day before his brother was born (they unfortunately died while I was in labour....oooppss) Two more were swiftly bought and replaced the others before my son had even realised :P 

I feel so sorry for this little guy and what's the best way to cheer a goldfish up? That's right, do a fish themed nail art. 

So here we are. The worst looking fish nail art you have ever seen.....


I'm am actually proud of the reed/plant things and lily pads... 
The fish on my nails looks even more poorly than my fish in real life Ha! 

On the other hand this polish by Cadillacquer is lush a blue with beautiful purple glitter and a micro glitter adds to the shimmer. 
Covers well with two coats :) 


So hopefully I will be able to rescue my fish and not have to send him to the big fish toilet in the sky. 
I am doing the pea thing but we will have to see.... hes not looking to good.

But at least he is forever immortalised in a bad nail art :P


**UPDATE** 
after a very late night and lots of pea feeding he looked to be recovering.... only to pass on to the great lake in the sky the next morning. 
My son still hasn't noticed.

27 Mar 2014

Polish Me Silly Pinky Swear I'm a Star Thermal Indie Polish

Today I have another beautiful thermal polish by Polish Me Silly

I LOVE THERMALS!! 

My nails are at that length where you can see the transition all the time so I get the gradient effect which is great.

This is called Pinky Swear I'm A Star.
 Its a pink when cold and white when warm polish packed with glitter, this includes pink and green stars!! 

This is the polish when cold.... 


Its pink.... and I love it! I think I may have been converted to pink as recently I have been wearing it quite abit! 
This is a funky bright pink (brighter than the pics) and I really like the green stars with this! I love pink and green together! 


Here is the polish warm...


AGAIN I love this shade too! You can really see all the glitter and who doesn't like a white crelly!!??

Transition shot..


I <3 it!! 


and finally the bottle shot (cold) 


I really love this polish. The formula was a little on this thicker side but in no way messed up my application. I used three coats for these pics and one topcoat. 

The stars of course can stick up a bit but that doesn't bother me at all. 

Its a funky bright polish perfect for summer!

What do you all think of this?? Are you a fan of thermals? 


In other news my new bulb came SMASHED! annoying!

22 Mar 2014

MDJ Creations If You Like Glitter...

Today we have a beautiful glitter topper by MDJ Creations.

I dont use much pink but this just screamed to be put over something nice and bright!


The topper features gold, silver and holographic glitter pieces. 


This screams summer to me so I just had to add a bit of stamping. This flowers just look so cute dont ya think? 

It really catches the light and is very flashy! I love a bit of glitz. 
I am not girly at all but I really like this! 

I used two coats in the pic over Zoya Areej. Another good thing about this is that you only need one coat of topcoat to smooth it out. 

You can buy MDJ creations handmade polishes from her ETSY store and please go over and show some love on her FACEBOOK page. 


This was sent to me for my honest review, please see disclaimer for details.

24 Feb 2014

MDJ Creations Arctic Night

Hello my lovelies! 

Today I have a beautiful jelly polish by MDJ Creations. 
It features shards of glitter that look like ice. 
I havent seen anything like it before, its like a icy snowstorm captured in a bottle.


I used three coats to get opacity and two coats of seche vite to smooth it all out. The is a lot of glitter in this formula but i still didnt have problems applying 


The only thing is that because of all the layers its on the thicker side on the nail which i am not keen on so i think next time i will layer this over a dark blue. 
The jelly effect of the polish does give great depth though so you can see loads of glitter.

This MDJ polish and others can be found on ETSY and FACEBOOK

What do you think? Would you wear this polish?


This polish was sent to me as a press sample. Please see disclaimer for details 

18 Feb 2014

Polish Me Silly Toe-Tally Cosmic Swatch and Review

Today I have a stunning multichrome to show you! 
Toe-tally Cosmic is what I would call a green base multichrome as its green I see the most. It flashes with purples, reds and golds. 

I just couldn't resist pairing this with some space stamping and hand painted star. I then added a diamante to top it off. 

This is two coats of Toe-Tally Cosmic over Sinful Colors Black on Black. Topped of with Glossy Glam top coat.


The green in this polish is, well, AMAZEBALLS!! Is such a deep rich colour. 
I really love it. 
Even without the shift it would be a really nice polish. 

This can also be worn alone without the black undies but the shift isnt as strong. 
Again, I like the idea of layering over different colours. 

The formula is really nice and goes on sooo smooth! To be fair it would have been opaque in one thicker coat, I just wanted to make sure it was 100% opaque. 


You can buy this and other Polish Me Silly polishes directly HERE

So what do you think? Are you a fan of multichromes? 
They seem to be all the fashion now!


MDJ Creations Raspberry-Licious Glow in the Dark!!

Ohhh My......

I am a lucky lady for sure! MDJ Creations sent me a few polishes to swatch and here's the first.
MDJ Creations make handmade 3 free nail polish, essential oil balms and jewelry. 

Raspberry-Licious is part of the Rooty Tooty Fresh and Fruity collection and is a glow in the dark polish. 
This is my first glow in the dark polish and taking the pictures were a learning curve indeed!! 


This is a juicy pink jelly packed with loads of different shapes and sizes of glitter. 
It applied well and these pics here are three thin coats and one coat of top coat which makes it smooth. 

I stamped using Konad black and CH-16 from Cheeky. 

Okay so here is the fun part.... the glow in the dark!! 

This polish glows GREEN but for some reason they show up blue on my camera. But I assure they glow GREEN :)
I charged it under my UV lamp to take these pics but Melissa from MDJ says it will glow after a few minutes under direct light, such as a desk lamp.


I was so impressed with the glow on these. So much fun!

Have you ever used a glow in the dark polish?

MDJ Creations sells through Etsy and you can also contact them on Facebook. 


I will have some more swatches coming soon so please keep ya eyes peeled (that saying is gross!)


*this product was sent to me for my HONEST review, please see my disclaimer page for more info**

2 Oct 2013

Scatterbrains!

I am having a bit of a scatterbrain day today so I thought I would use this beaut called Scatterbrains from Sick Lacquers.
See what I did there?!

This is a funky polish indeed. Bright hexes and black shards in a milky base. If you look closely there is also micro pink glitter! 


My nail art actually SUCKS on this. I am not happy really but if I had done the triangles straighter it would have looked fab. 

I used BarryM's Gelly in Grapefruit and Blueberry to do the design. 
The studs are from the Born Pretty Store. You can buy them HERE 

Sick Lacquers Scatterbrains is available from Peggie and John HERE